¶ Purpose
A rate contract is an agreement between the buyer and the supplier requesting that the supplier deliver the materials on a long-term basis according to the schedules specified in the "Rate Contract Open PO" at a negotiated price.
The advantages of a rate contract or rate agreement are as follows:
- The user can avoid generating purchase orders every time and getting approvals whenever materials are required.
- Since it is a "Rate Contract PO," the price need not be mentioned on the purchase order. The price must be set in the master (PTCD). Once the PO has been created, the price will be selected automatically from the PTCD master.
¶ Prerequisites
The following transactions must be completed before the Rate Contract (Open PO) transaction.
- The Prefix Combination Setting needs to be updated.
- The user access rights transaction must be completed.
- The Item Master with HSN code needs to be checked.
- The GST-TCD needs to be checked.
- The PTCD-Master needs to be updated if required.
- The Supplier Master needs to be defined.
- The Employee master needs to be updated if required.
- The Profit Center master needs to be checked.
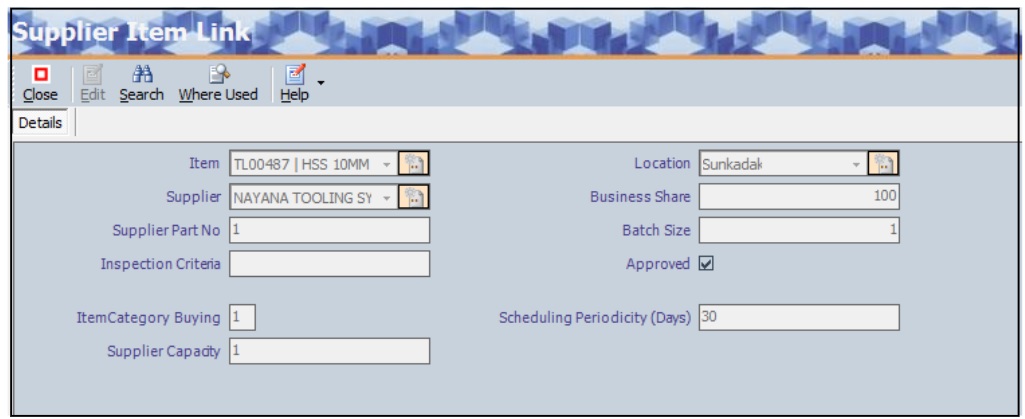
- The Item must be linked with the Supplier in the Item Master as shown below.
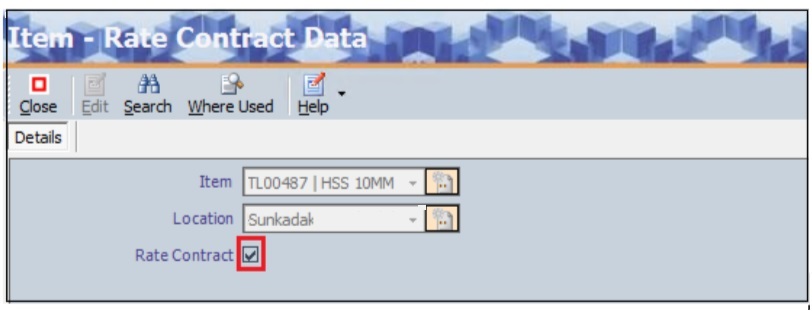
- The Rate Contract checkbox must be selected for Item in the Item Master as shown below.
¶ Rate Contract (Open PO)
The Rate Contract (Open PO) screen allows the user to request the supplier deliver the materials as per the schedules mentioned in the Rate Contract Open PO.
Navigation: Main - Menu → Transactions → Purchase → Purchase Entries → Purchase → Show List → Purchase Order → Rate Contract (Open PO)
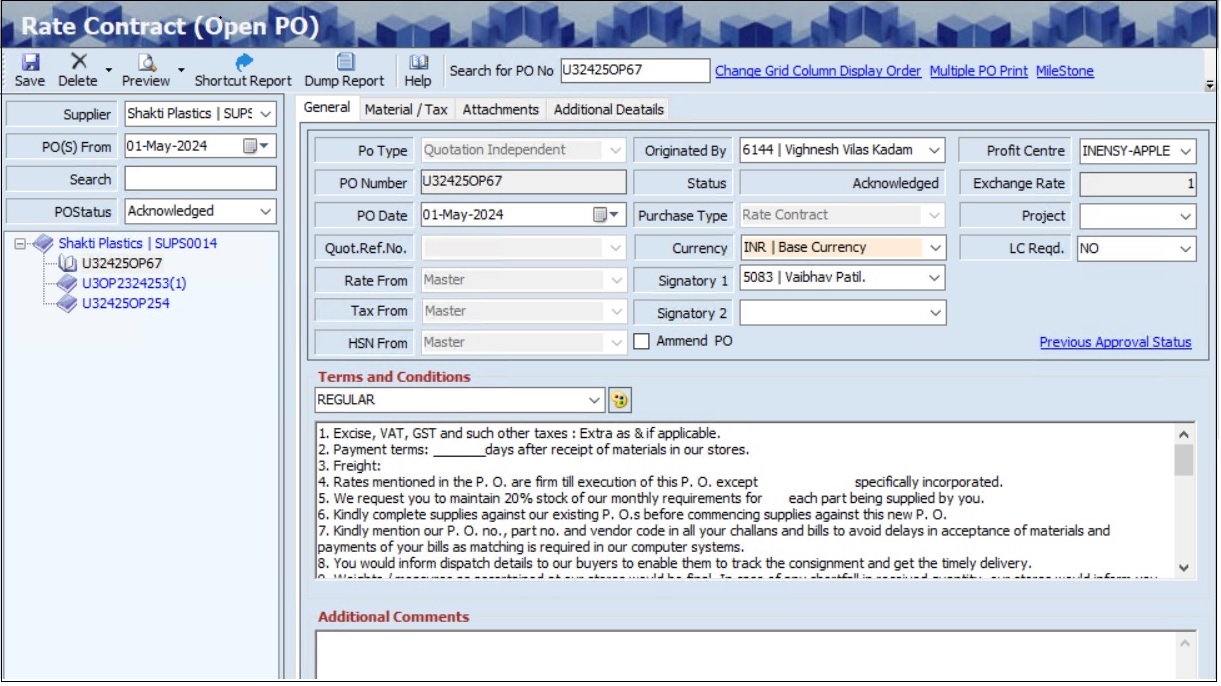
- The user must select the Supplier from the drop-down list in the left panel of the screen.
- The user can search for a particular order based on the Supplier, PO(S) From (Date) and PO Status.
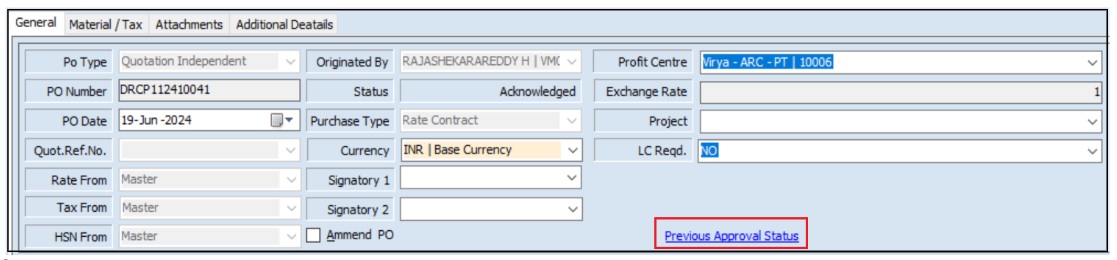
- The Rate Contract (Open PO) screen allows the user to enter details into four tabs as mentioned below.
- General
- Material/Tax
- Attachments
- Additional Details
- The user must select the Purchase Type and Profit Centre from the drop-down list.
- The user must select the Rate From, Tax From, HSN From, Originated By, Project and LC Required from the drop-down list.
- The user must select Signatory 1 and Signatory 2 from the drop-down list for the two stages of the approval process.
- The user must select the appropriate LC Reqd. (required) details from the drop-down list.
- The user can select the appropriate Terms and Conditions (fixed and variable).
- The user can enter the Additional Comments if any.
- The Material /Tax screen allows the user to select the Material from the drop-down list.

- The user must click the material grid and press F3, the following material list will appear.
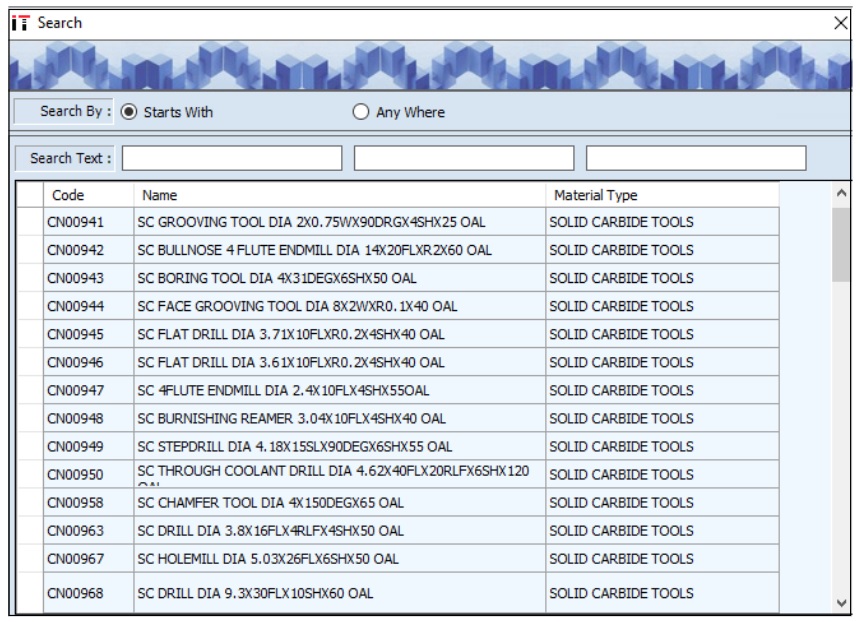
- The user can search for a particular material based on the Code, Name and Material Type.
- Once the user selects the appropriate material, the SL No., Material Category, Alloy, UOM, Stock UOM, Item Description, Description/Remark, HSN Number and Basic Account Ledger details will appear.

- The user can click the Additional Detail link, to add additional details of each material.
- The user can click the Tax Detail link, to add tax details for each material and the following screen will appear.
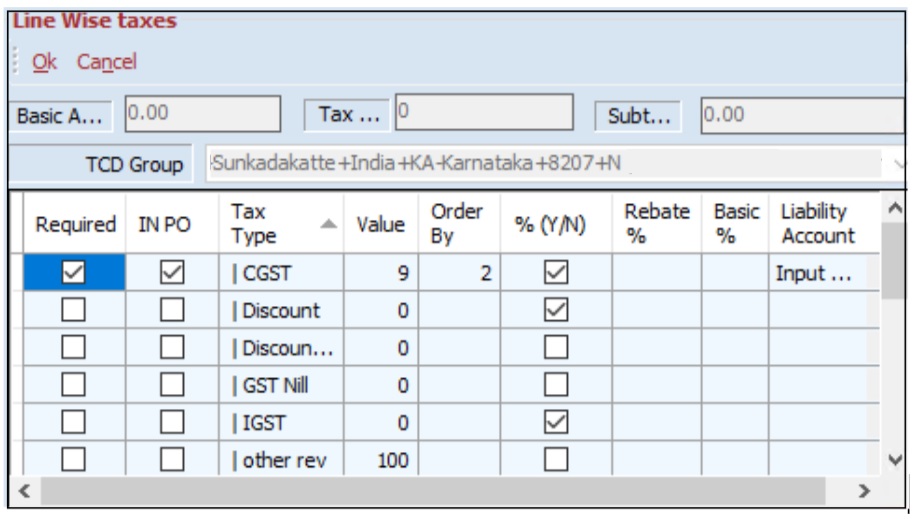
- The Line Wise Taxes screen displays details such as Basic Amount, Tax, Subtotal, TCD Group, Required, IN PO, Tax Type, Value, Order By, %(Y/N), Rebate %, Basic % and Liability Account.
- Click OK, the screen will appear as shown below.
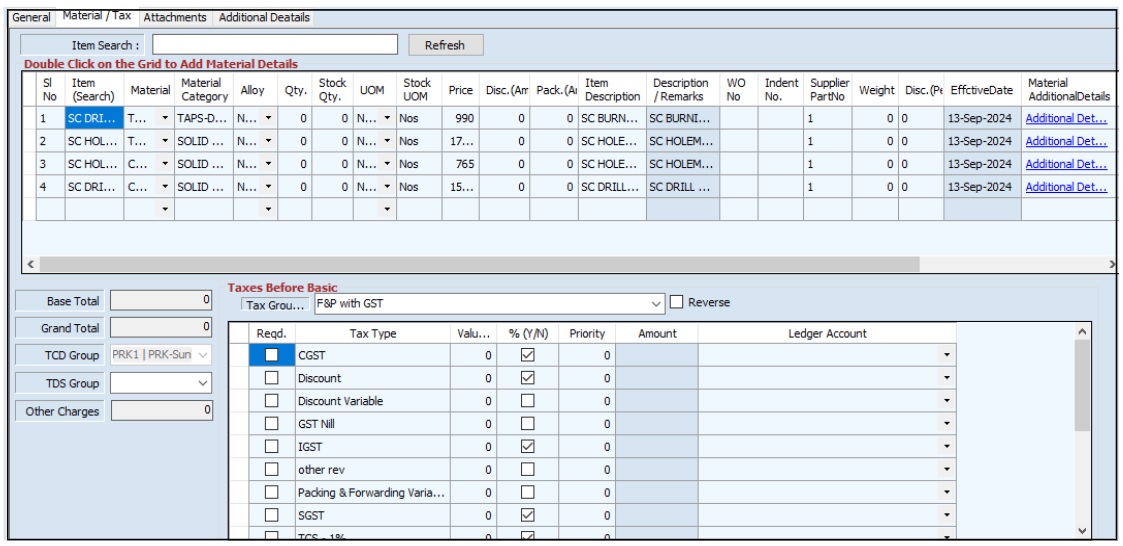
- The Material /Tax screen displays the details such as Item Search, Sl. No., Material, Material Category, Alloy, Qty, Stock Qty, UOM, Stock UOM, Price, Disc (Amt), Pack (Amt), Item Description, Description/ Remarks, WO No., Indent No., Supplier Part No., Weight, Disc (Perc), Material Additional Details, Revision No., HSN No., Tax Details, Basic Account, Base Total, Grand Total, TCD Group, Tax Group Tax Type, Value, Account and Ledger Account.

- The Item Search option allows the user to search for the material listed in the rate contract order based on the material name or code.
- The user can select the appropriate TDS Group from the drop-down list.
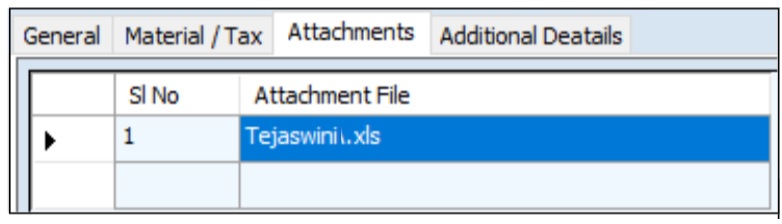
- The Attachments section allows the user to upload attachments, view the uploaded attachments and delete the uploaded attachments if required.
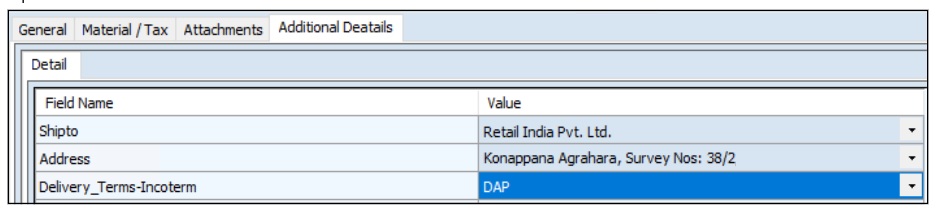
- The Additional Details section allows the user to enter additional details, such as the Field Name and Value, based on the requirement.
- The screen below displays an example of additional parameter details.
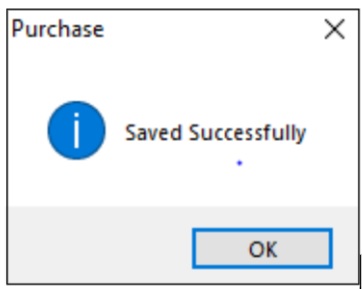
- Click Save, and the Rate Contract (Open PO) number will appear on the left panel of the screen.

- Click the Change Grid Column Display Order link, to change the column position of the material detail if required.
- Click the Credit Period Details link, to add credit period details based on the GRN or Invoice.
¶ Multiple PO Print
The Multiple Document Print screen allows the user to print multiple rate contracts at the same time.

- Click the Multiple PO Print link, the following screen appears.
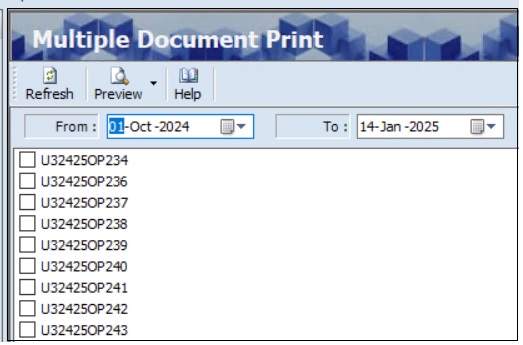
- The user can search for rate contract details based on the From Date and To Date.
- Click Refresh, and the list of rate contract reference numbers will appear.
- The user must select the checkbox for the appropriate rate contract reference number.
- Click Preview, to preview details in Excel or HTML format.
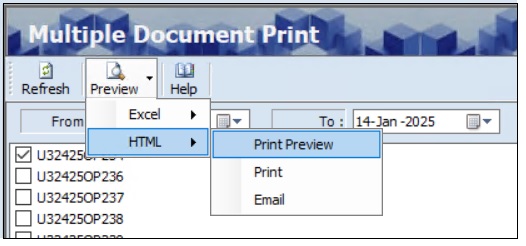
- Click Print Preview, the following screen will appear.
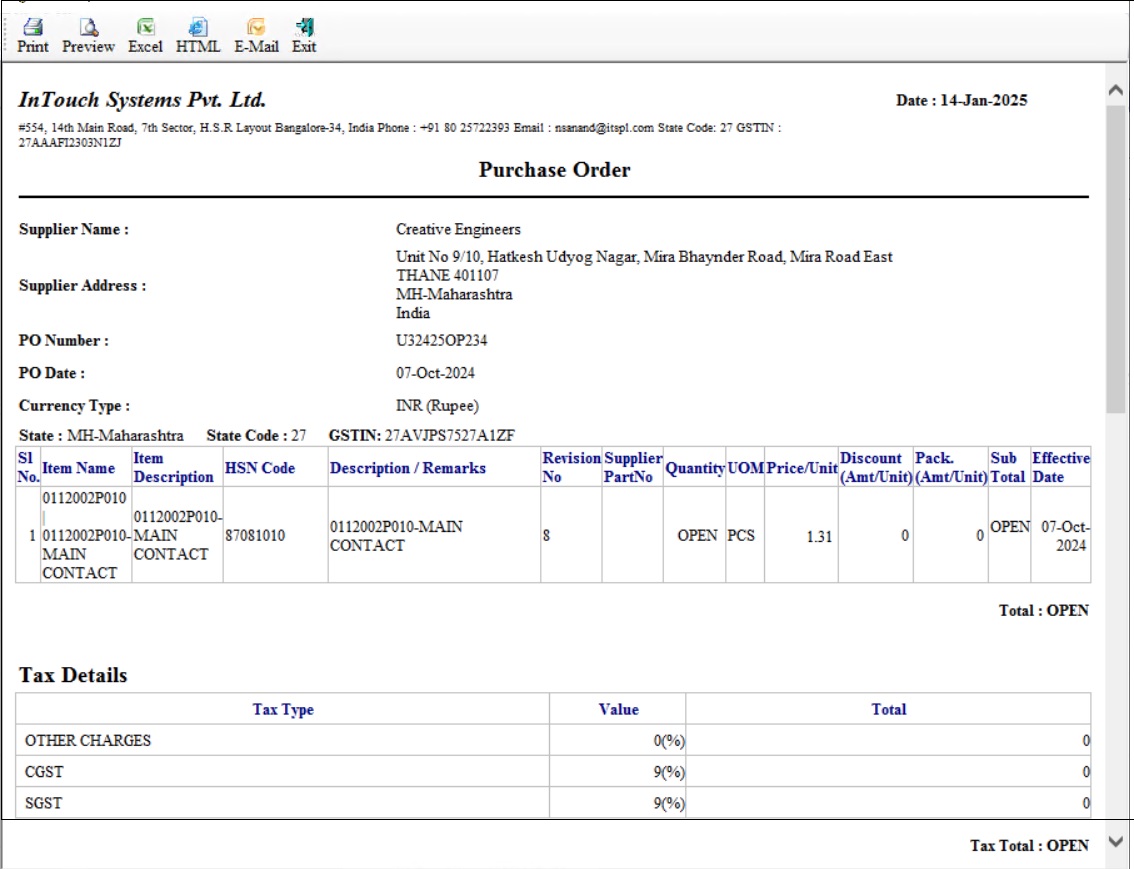
- The ITSPL Report Viewer screen allows the user to print all selected documents one after one. Click Print, to print documents.
- Click Preview, to view details before printing.
- The user can view details in Excel and HTML format if required.
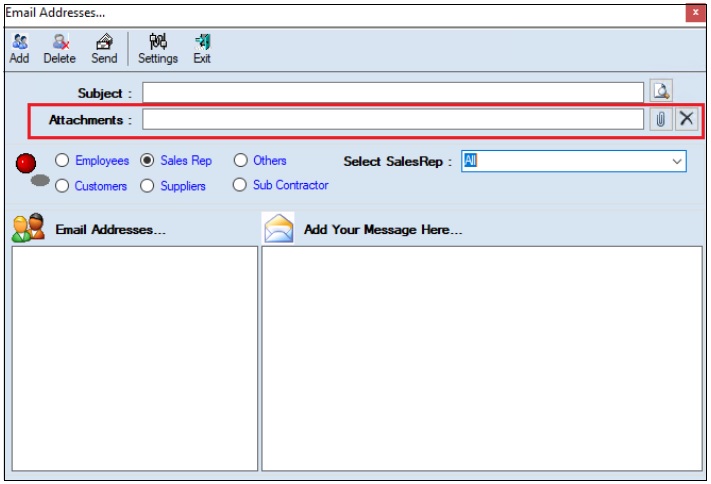
- Click Email, the following screen will appear.
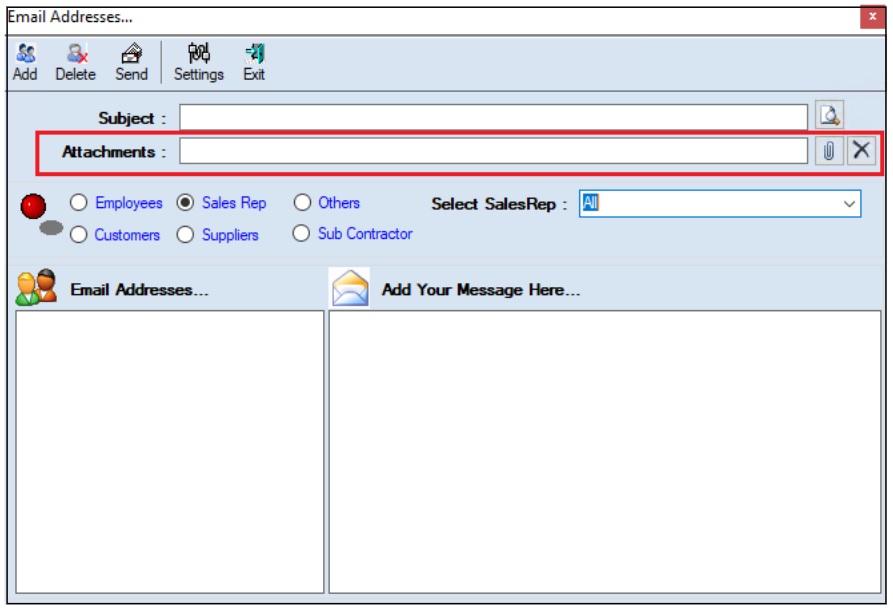
- The user must enter the subject.
- The user can upload multiple attachments if required.
- The user can delete the uploaded attachments if required.
- The user must select one of the options from Employees, Customers, Sales Rep, Suppliers, Subcontractors or Others.
- Once the user selects the appropriate option, the corresponding Email IDs will appear in the Email Address section.
- The Add Your Message Here section allows the user to add messages.
- Click Send, to send emails.
- Click Add, to add the new email address.
- Click Delete, to remove the selected mail ids.
- Click Settings, the following screen will appear.
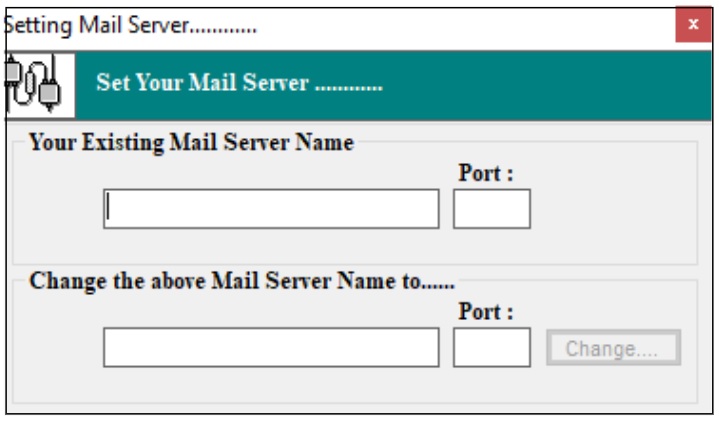
- The user must enter details of the Your Existing Mail Server Name, Port (Existing), Change the above Mail Server Name To and Port (New).
- Click Change.
¶ Previous Approval Status
The Previous Stages Comments History screen allows the user to view details of the approval stages of the rate contract.
- Click the Previous Approval Status link, the following screen appears.
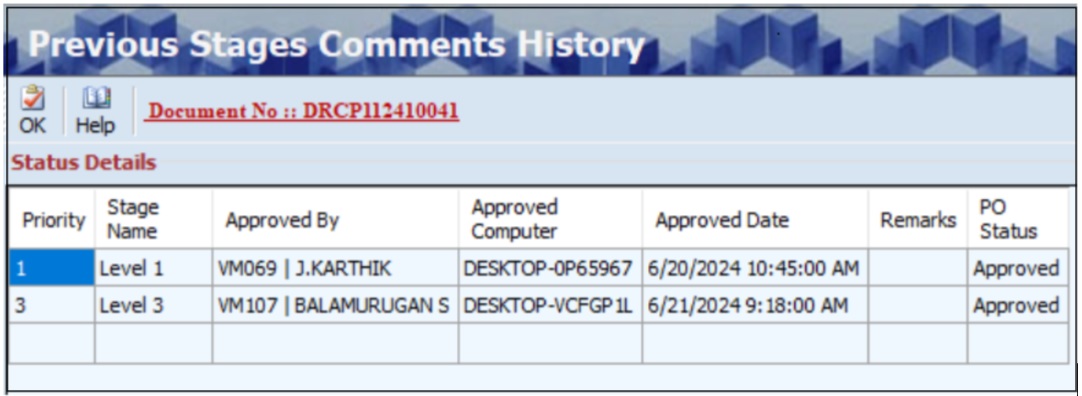
- The Previous Stages Comments History screen displays details such as Priority, Stage Name, Approved By, Approved Computer, Approved Date, Remarks and PO status.
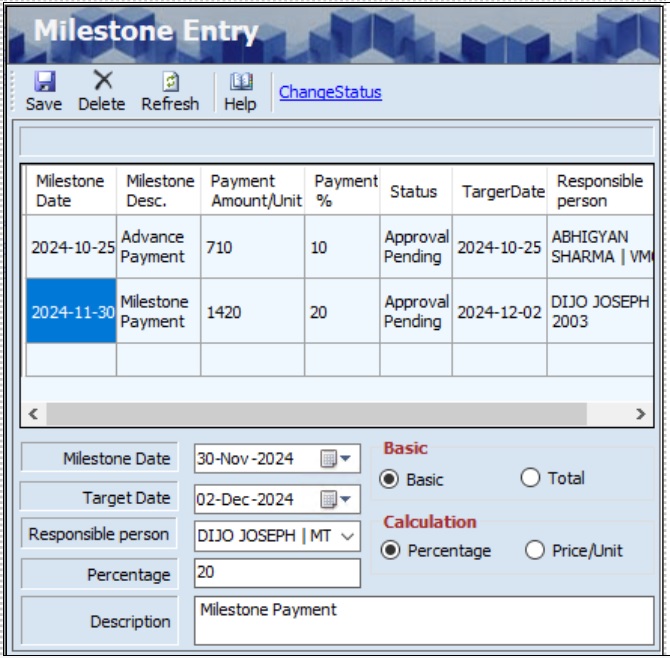
¶ Milestone Entry
The Milestone Entry screen allows the user to enter pre-determined payment details that will be released when the project reaches a specific milestone or makes advance payments.

- Click the Milestone link, the following screen appears.

- The user must select the appropriate Milestone Date and Target Date from the drop-down calendar.
- The user must select the appropriate Responsible Person from the drop-down list.
- The user can select the payment based on either Basic or Total.
- The user can select the calculation based on either Percentage or Price/Unit.
- If the user selects calculation based on the percentage, the user must enter the Percentage.
- If the user selects calculation based on the price/unit, the user must enter the Price (Payment Amount).
- The user must enter the Description.
- Click Save, the following message will appear.
- Click OK, the screen will appear as shown below.
- Click the Change Status link, the following screen appears.
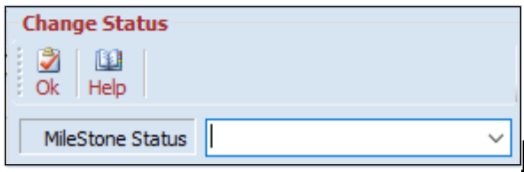
- The user must select the appropriate Milestone Status from the drop-down list.
- Click OK.
¶ View or Print Purchase Order
The Preview option allows the user to view and print the created or existing order details.

- The user must select the Supplier from the drop-down list.
- The user must select the PO(S) From (Date) from the drop-down calendar.
- The user must select the order reference number from the left panel of the screen.
- Click Preview, the user must select one of the HTML, Excel, Schedule Print, Open Office option or Export To PDF options.
- If the user selects the HTML option, the following screen will appear.

- The ITSPL Report Viewer screen allows the user to print all selected documents one after another.
- Click Print, to print documents.
- Click Preview, to view details before printing.
- The user can view details in Excel and HTML format if required.
- Click Email, the following screen will appear.
- The user must enter the Subject.
- The user can upload multiple attachments if required.
- The user can delete the uploaded attachments if required.
- The user must select one of the options from Employees, Customers, Sales Rep, Suppliers, Subcontractors or Others.
- Once the user selects the appropriate option, the corresponding Email IDs will appear in the Email Address section.
- The Add Your Message Here section allows the user to add messages.
- Click Send, to send emails.
- Click Add, to add the new email address.
- Click Delete, to remove the selected mail ids.
- Click Settings, the following screen will appear.

- The user must enter details of the Your Existing Mail Server Name, Port (Existing), Change the above Mail Server Name To and Port (New).
- Click Change.
¶ Delete Order Details
The Delete option allows the user to delete the existing or added order details if further or subsequent transactions are not executed.

- The user must select the Supplier from the drop-down list.
- The user must select the PO(S) From (Date) from the drop-down calendar.
- The user must select the order reference number from the left panel of the screen.
- The user must select the Material from the Material/ Tax section.
- Click Delete, the system allows the user to select either Selected Material or All Material, and the following message will appear.

- Click Yes, the following message will appear.

- The user must enter the Description / Comments.
- Click Ok, to delete selected details.
¶ Send For Approval
The Send For Approval screen allows the user to send the rate contract for approval.

- Click the Send For Approval link, the following message appears.
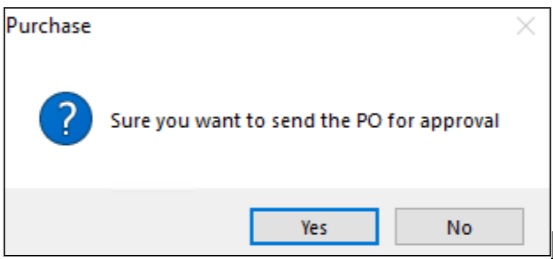
- Click Yes.
¶ Functional Use Cases
| SL No. | Use Case | Business Scenario | Functional Outcome in ERP |
|---|---|---|---|
| 1 | Create Rate Contract | The organization wants to fix prices with a vendor for frequently procured items. | The ERP allows users to define item-wise rates, validity period, and vendor details. |
| 2 | Define Contract Period | The user needs to specify the duration during which the agreed rates remain valid. | The system captures the contract start and end date for effective rate control. |
| 3 | Set Item and Price Details | The procurement team finalizes item-wise pricing, taxes, and delivery terms. | The ERP stores item codes, units, agreed rates, and applicable tax percentages. |
| 4 | Revise or Cancel Rate Contract | The user needs to update pricing or cancel an existing contract. | The system allows contract revisions or cancellations with proper version control and audit trail. |
| 5 | Manage Multiple Contracts per Item | The same item may have different rates with different vendors. | The ERP allows multiple rate contracts for the same item with vendor-specific configurations. |
| 6 | Generate Reports | The purchase team wants to review contract rates and validity across items or vendors. | The ERP generates contract summary and expiry reports for review and procurement planning. |
¶ Use Case Scenario
- Click here for a detailed use case scenario for the Rate Contract transaction.
¶ Transaction Checklist
| Steps | Checklist Item | Details / Purpose |
|---|---|---|
| 1 | Prefix Combination Setting | Ensure prefix combination is updated to generate unique Rate Contract PO numbers. |
| 2 | User Access Rights | Verify that the user has access rights to create Rate Contract (Open PO). |
| 3 | Item Master with HSN | Check that the required items are created in Item Master with correct HSN codes. |
| 4 | GST-TCD Setup | Ensure GST-TCD master is updated for correct tax applicability. |
| 5 | PTCD Master | Verify that negotiated price and tax details are updated in PTCD Master, as price will auto-pick. |
| 6 | Supplier Master | Confirm that supplier details are defined and active in Supplier Master. |
| 7 | Employee Master | Ensure employee master is updated for signatory and approval stage assignments. |
| 8 | Profit Centre Master | Verify profit centres are defined and linked properly for allocation. |
| 9 | Item-Supplier Linking | Check that the item is linked with the supplier in Item Master. |
| 10 | Rate Contract Checkbox | Ensure the "Rate Contract" checkbox is selected for the item in Item Master. |
| 11 | Approval Stages Setup | Verify that approval stages and signatories are configured. |
| 12 | Mail Server Settings | Check that email server details are updated if multiple PO print or emailing is required. |
| 13 | Milestone Entry (if applicable) | Confirm milestones are defined if payments are based on project stages. |