¶ Purpose
The Material Inward (GRN With PO) enables the user to confirm the materials received from a supplier against the raised purchase order.
¶ Prerequisites
The following prerequisites must be completed before the Material Inward (GRN With PO) transaction.
- The Prefix Combination Setting needs to be updated.
- The user access rights transaction must be completed.
- The Warehouse master must be defined, and appropriate warehouse access rights must be assigned to relevant users for the corresponding location.
- The Supplier Master needs to be defined.
- The Purchase Order Number (General Purchase Order or Rate Contract) is mandatory.
- The PO must be acknowledged, and the delivery schedule must be entered.
- The Gate Entry Number is mandatory if the system is configured to use Gate Entry for processing.
¶ Material Inward (GRN With PO)
The Material Inward (GRN With PO) screen allows the user to add material details received from the supplier specified in the particular purchase order.
Navigation: Main - Menu → Transactions → Inventory → Inventory Entries → Inventory → Show List → Receipts → Material Inward (GRN With PO)

- The user can search for transactions based on the Supplier and GRN(s) From.
- The user must select the appropriate Supplier from the dropdown list.
- Once the user selects the appropriate Supplier, the PO No., GRN No. and GRN Date will appear automatically.
- The user must select the checkbox of a particular PO Number.
- Once the user selects the appropriate checkbox for PO Number, the PO Type, Purchase Type and Material Details will appear.
- The user must enter details of the Invoice/Bill Number.
- The user must enter the Supplier Invoice Amount.
- The Material Details section displays the details such as Material, UOM, Landed Price (INR), Batch No., Description, Supplier Qty., Alt UOM, Alt UOM Qty, Supplier PUOM Qty., Alt UOM Rate, PO No., Ex Rate, Weight, Additional UOM Qty (quantity), Supplier Part No., Ident No., Loss Entry, MRP Price, Discount, Packing, Alloy, Sl. No., Tax Details, QC Required, Delivery Schedule, Additional Details, PO Qty., Inwarded Qty., PO Bal Qty, Supplier Identification and Warehouse.
- The user must enter details of the Received Qty.
- The Attachment section allows the user to upload attachments if required.
- The Additional Details section allows the user to add additional details if required.
- Click Save, the following message will appear, and the receipt number will appear on the left panel of the screen.
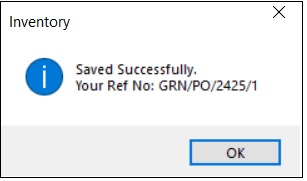
- Click OK.
¶ View Purchase Order Details
The View Purchase Order screen allows the user to view the details of the particular Purchase Order.

- Click PO No. link, the following screen will appear.

¶ Change Grid Column Display Order
The Change Grid Column Display Order link allows the user to change the column position of the material detail if required.

- Click the Change Grid Column Display Order link, the following screen will appear.

- Click OK.
¶ Multiple Document Print
The Multiple Document Print screen allows the user to print details of multiple GRNs at once for the particular supplier.

- The user must select the appropriate Supplier from the left panel of the screen.
- Click the Multiple GRN Print link, the following screen will appear.
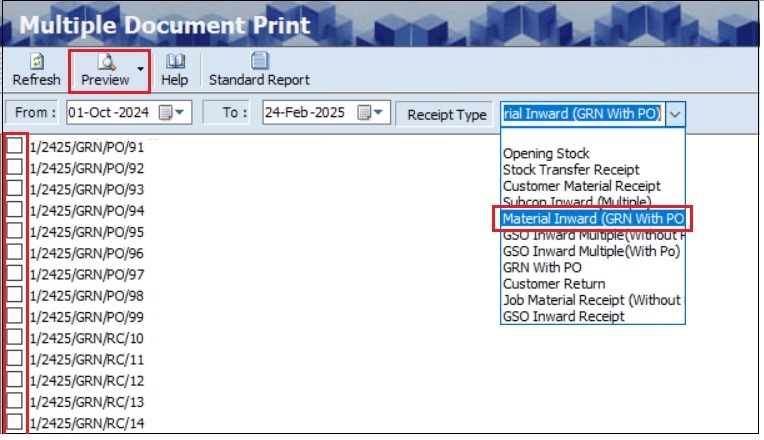
- The user must select the appropriate details such as From (Date) and To (Date) from the dropdown calendar.
- The user must select the Receipt Type as Material Inward (GRN With PO) from the dropdown list.
- The user must select the checkbox for the particular GRN.
- The user can select multiple transactions at once if required.
- Click Preview, to generate the GRN details in Excel or HTML format for printing.
¶ Add Transporter Cost
The Transporter Cost screen allows the user to add cost details of the transporter.
- The user must select the appropriate Supplier and GRN reference number from the left panel of the screen.
- Click the Transporter Cost link, the following screen will appear.

- The user must select the checkbox for Others.
- The user can select the appropriate Grn’s From (Date) and To (Date) from the drop-down calendar.
- Once the user selects the appropriate GRN Date, the list of GRN’s will appear.
- The user should select the appropriate checkbox of the GRN reference number and click Refresh.
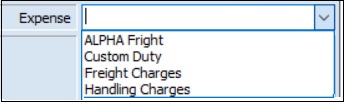
- The user can select the appropriate Expense from the dropdown list.
- The user must enter the Value for a particular Expense.
- Click Add Value, the new value details will appear as shown below.

- The user must copy the GRN Reference Number and paste it into the Reference Number field.
- Click Save.
Note:
- The user can add multiple Expenses if required.
- If the user adds multiple expenses, the New Value will be updated based on the expenses added.
¶ Add Additional Cost
The Additional Cost screen allows the user to add cost details.

- The user must select the appropriate Supplier and GRN reference number from the left panel of the screen.
- Click the Additional Cost link, the following screen will appear.

- The user must select the appropriate Material from the drop-down list.
- Once the user selects the material, the corresponding charges and Qty details for that material will appear automatically.
- The user can select the Type (Plus or Minus) from the dropdown list.
- The user must enter the Expense and Amount for additional charges related to a specific material.
- Click Save, the following message will appear.
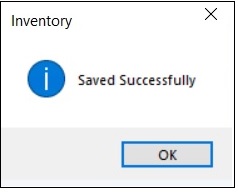
- Click OK.
¶ Barcode Print
The Barcode Print screen allows the user to print the Barcode for GRN or Items based on the specified format.

- The user must select the appropriate Supplier and GRN reference number from the left panel of the screen.
- Click Barcode Print link, the following screen will appear.
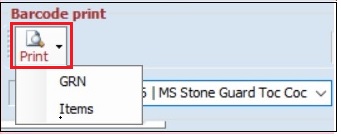
- The user must select the Material from the dropdown list.
- Click Print.
- The user must select the appropriate format option as the GRN or Items.
¶ Add Additional Material Information
The Additional Material Information link allows the user to add materials received along with specific materials at the time of GRN.

- The user must select the appropriate Supplier and GRN reference number from the left panel of the screen.
- Click the Additional Material Info link, the following screen will appear.

- The user must select the material from the dropdown list.
- The user can select the additional material from the drop-down list, if any.
- The user must enter the Quantity and Price details.
- Click Ok to confirm and add another material if required.
- Click Save.
¶ View or Print Material Inward (GRN With PO)
The Preview option allows the user to view and print the created or existing GRN details.

- The user must select the Supplier from the drop-down list.
- The user must select the GRN’s From (Date) from the drop-down calendar.
- The user must select the GRN reference number from the left panel of the screen.
- Click Preview, the user must select the HTML or Export to Excel or Export To Open Office option.
- If the user selects the HTML option, the following screen will appear.

- The ITSPL Report Viewer screen allows the user to print all selected documents one after another.
- Click Print, to print documents.
- Click Preview, to view details before printing.
- The user can view details in Excel and HTML format if required.
- Click Email, the following screen will appear.
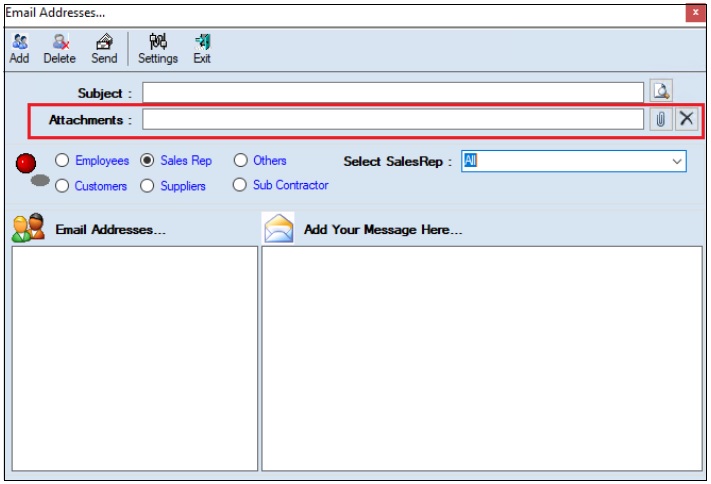
- The user must enter the Subject.
- The user can upload multiple attachments if required.
- The user can delete the uploaded attachments if required.
- The user must select one of the options from Employees, Customers, Sales Rep, Suppliers, Subcontractors or Others.
- Once the user selects the appropriate option, the corresponding Email IDs will appear in the Email Address section.
- The Add Your Message Here section allows the user to add messages.
- Click Send, to send emails.
- Click Add, to add the new email address.
- Click Delete, to remove the selected mail ids.
- Click Settings, the following screen will appear.
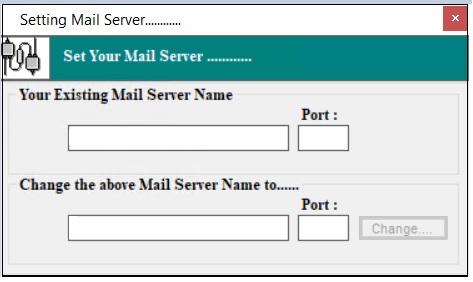
- The user must enter details of the Your Existing Mail Server Name, Port (Existing), Change the above Mail Server Name To and Port (New).
- Click Change.
¶ Delete Material Inward (GRN With PO)
The Delete option allows the user to delete the existing GRN details before transport cost, additional cost, additional material, bought out inspection, store allocation and bill booking transactions.

Note: If the user has already completed (transport cost, additional cost, additional material, bought out inspection, store allocation or bill booking) any of these transactions, the user must delete these transactions before deleting GRN.
- The user must select the Supplier from the drop-down list.
- The user must select the GRN’s From (Date) from the drop-down calendar.
- The user must select the GRN reference number from the left panel of the screen.
- The user must select the Material from the Material Detail section.
- Click Delete, the system allows the user to select either Selected Material or All Material and the following message will appear.
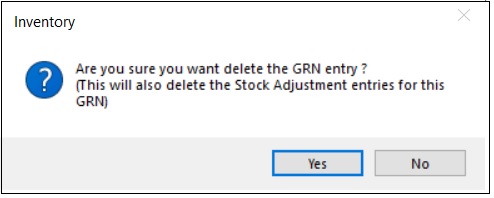
- Click Yes, the following message will appear.
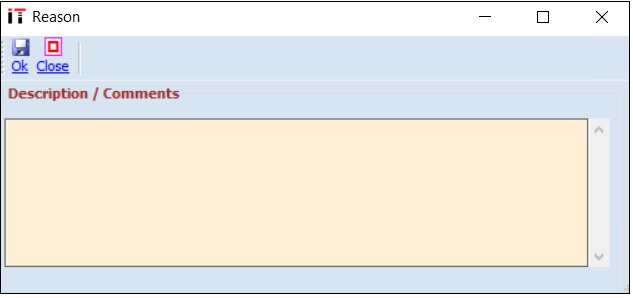
- The user must enter the Description / Comments.
- Click Ok, to delete the transaction details.
¶ Functional Use Case
| SL No. | Use Case | Business Scenario | Functional Outcome in ERP |
|---|---|---|---|
| 1 | Record Material Receipt Against PO | Vendor delivers materials as per the confirmed Purchase Order. | ERP updates stock based on PO reference and creates a Goods Receipt Note (GRN). |
| 2 | Validate Material Against Purchase Order | Received items must match the quantity and specifications ordered in the PO. | ERP auto-fills PO details and allows users to validate delivery against ordered items. |
| 3 | Enable Three-Way Matching (PO–GRN–Bill) | For supplier invoice processing, materials must be received and verified before the Bill Booking. | GRN acts as proof of delivery and enables matching with PO and vendor bill. |
| 4 | Maintain Supplier-Wise Inward Traceability | The company needs to track which supplier delivered which items and when. | ERP links GRN to supplier and PO, enabling supplier performance and traceability reports. |
| 5 | Support Quality Check Before Acceptance | Materials may require inspection before acceptance into stock. | ERP can route GRN through a quality check process before making stock available. |
| 6 | Generate Acknowledgement and Documentation | The receipt of goods must be documented for internal records and vendor confirmation. | ERP generates GRN documents with reference to PO, items, and quantities. |
| 7 | Trigger Stock and Financial Updates | GRN affects both inventory stock and accounting (e.g., GR/IR clearing). | System updates inventory and prepares for invoice (bill) booking and payment cycle. |
¶ Use Case Scenario
- Click here for a detailed use case scenario.
¶ Transaction Checklist
| Steps | Checklist Item | Details / Purpose |
|---|---|---|
| 1 | Verify Purchase Order (PO) Reference | Ensure the PO exists, is approved, and is open for material receipt. |
| 2 | Check Supplier and Delivery Details | Confirm the vendor name, delivery date, and location match the PO. |
| 3 | Validate Items Against PO | Match received items, quantities, and units with those ordered in the PO. |
| 4 | Record Actual Quantity Received | Enter the exact quantity received for each item; note partial or full receipt. |
| 5 | Enter Discrepancy Details (if any) | Capture differences in quantity or quality and record reasons for the mismatch. |
| 6 | Route to Quality Inspection (if applicable) | If quality control is enabled, send received items for inspection before approval. |
| 7 | Save and Submit the GRN | Finalise and submit the transaction to officially record the receipt in ERP. |
| 8 | Update Stock in Inventory | System updates the item-wise stock in the relevant warehouse. |
| 9 | Trigger Financial Posting (if enabled) | System creates GRN-linked accounting entries (e.g., GR/IR clearing). |
| 10 | Print or Export GRN Document | Generate a formal GRN document for internal records or supplier confirmation. |